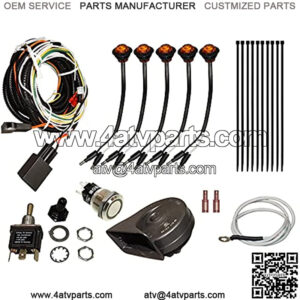
HOW TO INSTALL A PLUG & PLAY TURN SIGNAL KIT ON A POLARIS GENERAL
The first thing we’re gonna do is remove the hood. You want to cut this grommet here in order to feed wiring through. We already have a winch installed, so ours is already cut. Now let’s head on into the machine.
Remove all the seats from the machine. We’re going to remove the six push pins holding the lower portion of the trim panel in. The push pins are located here. There’s two back behind, and there’s one here and also one here.
Once those are removed, go ahead and remove the panel and set it aside.
Remove these three push pins and then remove the following T30 Torx screws.
Next, we’re gonna pull this driver’s side trim panel out just enough so we can gain access. We already removed all our hardware so you’re gonna grab a hold of it and pull it out. Once you get it pulled out this far, we’re gonna remove the bezel for the gauge cluster. Just pick up on the back side of it here. Pop it off the two tabs. It’s got two tabs on the side as well. Then we’ll just set this aside.
Pull the handle to dump the bed backwards. We’re gonna remove the pin and the shock, that way we can gain access easier. Let the bed go as far back as it can.
Now take our harness and find the two plugs that go to the rear of the machine. Start feeding them through this grommet. You may have to pull the grommet out enough to get the harness started through.
You’re also gonna shove this portion of the plug through. Once you start feeding it in the hole, you want to go on the inside and make sure that this portion of the harness goes down behind the dash.
Once you’ve located your wires that you pushed down through the dash, pull back the trim panel that we previously loosened. Start feeding the harness in between the trim panel, and start feeding the harness all the way back through. Pull a good amount of slack through the hole there.
Pull back this panel enough so you can see down in here. Continue running the harness, and in this hole right here, push the wiring harness for the turn signal kit. You’ll feed the wires through until they’re coming out the back of the machine.
Now we’ll go back to the back and locate where the wires are coming through. Pull your harness through like this. Make sure that you run it on top of the frame. You’ll locate the factory plug, then take your popper tool. Pop it off the frame here. Go ahead and disconnect it.
Take the SuperATV harness. We have the female end. We’re gonna plug it into the male on the machine’s harness. Make sure it fully snaps in. Then we’re gonna take the female from the SuperATV and go to the male on the factory. Make sure it snaps in. Go ahead and take this connector and put it right back where it was in the frame.
Then make sure we take the harness and wrap it around the frame. That way it’s not interfering with anything when the bed comes down. We don’t want it to get smashed or anything like that.
Make sure you’ve got a good amount of slack. You don’t want it pulled too tight. This harness does fluctuate a little bit whenever you lift up the bed.
We’re not going to use the license plate light today so we’re going to fold this portion of the harness up, put some electrical tape around it, and zip tie it straight to the harness just to make sure it stays out of the way.
We’re gonna come back to the front. Locate the portion of the harness that says “column switch” on it. This is going to plug into your turn signal stalk. We’re gonna push it back through the same grommet. You want to make sure this goes through, as well. This goes to your indicator light. We’ve got it fed up to the grommet here.
When you’re feeding this, make sure you feed it toward the right. It’s gonna end up where the dash column is. We’ll feed it up toward the right. Make sure we get it up on top of the column there.
We’re gonna head inside and make sure it’s going to the right location. We’ll remove the actual dash cluster in order to gain access, to reach behind the dash there. Then grab the harness and pull it through.
Go ahead and make our screws here. I’ll just lay this out of the way. We’ve got the hardware in a good spot. Now we’ll reach back and locate our harness. Pull it up and through.
Once we get it to this point, we’ll head back up to the front.
Now take our harness that has our turning signal leads on it. Find the side that says “left,” which is gonna be the driver’s side. We have the side that says “right,” that will be the passenger side.
We’ll feed it through this grommet. It’s easier to pull the grommet out and feed them all through the grommet, like this.
Now do the same thing on the driver’s side. We’ve got the harness pulled through there.
We’re gonna make sure we’ve got the right side. That’s gonna be the passenger. We’ll feed this over toward the passenger side of the machine. Take the driver’s side and we’ll feed it over this way. Then go ahead and put your grommet back in place.
Now we’re gonna go down below the machine and start running our wires.
You’re gonna find six turn signal lights in the kit .The awesome thing about SuperATV’s Turn Signal Kit is you can use two, you can use one on each side, or you can use all six. It’s totally up to you. You can mount them wherever you want. One thing you want to keep in mind, though, is your state’s law. Make sure you’re compliant with those.
We’re gonna mount ours here, we’re using a bumper. We’re only going to be using two.
You can use a three-quarter inch drill bit. We’ve found the step bit just makes the best holes. So here’s one of our marked locations. I’m gonna make sure we get the bit as centered as possible.
We’ve got our holes drilled in our plastic, so now we’ll take our turn signal light and the wires through the hole. Go ahead and peel the grommet and then insert it in the hole. Make sure the grommet is fully seated. You may have to push on the backside as you push the indicator light through. Make sure it doesn’t get wrinkled.
Then you’ll repeat the steps for the rest of the holes.
We’ve got our turn signal lights installed, so now we’re gonna connect our harness to the harness on the turn signal lights.
You’ll take the white wire, which is labeled “ground,” to the white wire on the turn signal light. This is going to be the signal light for the left. This will be our hot wire. Go ahead and connect it to the black. We’re going to do that for both of them, since we’re only using two per side today.
If you have any excess wiring or excess plugs, on the plugs you’ll take some electrical tape. Tape these connections up really nice. Fold them up, zip tie them to the frame, and then repeat the steps for the opposite side.
The next step is to install the flasher relay. You can mount this any place you’d like, depending on what you’ve got. If you have a bunch of accessories wired up, you may want to mount it inside. We don’t, so we’ll just punch out one of these holes here. Use a bolt and just bolt it right to the machine.
Locate the portion of the harness that has the two markings. It says “12 volt” and “ground.” The ground wire is gonna go on the center post of your accessory bar, which is located underneath the hood.
If you have a newer model General, you’ll have to buy an accessory plug. You can get one of those from SuperATV.com. But on this General, we just have the accessory bar, so we’ll go ahead and remove this nut here.
Move the washer and set it aside. We’re also going to remove our 12V feed-on accessory nut. Set these aside for just one second.
This one’s labeled “ground,” so we’re gonna lay this on the center stud. Take our washer and reinstall it, as well as our nut. Get that started.
Now we’re going to do the same thing over here. We’re gonna take our 12V feed-on accessory source, which is the far left post. Slide that on the stud. Place the washer down. Start the nut.
Tighten these up now. Make sure that we get a good connection. Whenever you get it tight, you want to grab a hold of the connections and make sure you can’t move them side to side. If you can, you need to tighten them up a little bit more.
And we are good to go. The kit’s powered up now, so let’s move on into the machine.
We’re gonna install the horn. This is another one of those things you can mount it up wherever you like. We found the best place to mount it is right here, using the hardware from the coolant jug.
Go ahead and remove the screw here on the far left side. Once you’ve got it out, set it aside for one moment. Take your horn and orient it like this, so it’s projecting the sound forward. Lay it down in here. And right here, after the dot, you can see there’s a slight bend. We went ahead and bent it to make that bend there. Lay it down like that. Now take your hardware and tighten it back up.
Now take your wiring. One of the other things with the horn is, it doesn’t matter if you wire this one to be the hot one or this one to be the ground. Either way, the horn will work.
We’re just gonna feed it up through here. Make sure both connections are nice and tight. This nut right here, you want to make sure it’s tight as well.
We’re gonna take our turn signal stock and plug it into the harness that we previously ran up through the dash. Make sure that’s a good connection.
One thing you may wonder is what these two connections here are for. It’s for the indicator light that’s included in the kit. You can install it. The customer that we’re installing this for decided he didn’t want it. He was gonna be okay with the indicator light that’s on the stock. We’ll show you how to ground that out and get that to function.
We’ll take our provided band clamp and run it through the holes here. Tuck our wiring back up into the dash to get it out of the way. Put your cluster back.
We’re gonna take the clamp and get it started on the opposite side of itself. Keep tightening until you get it to where it’s secure.
Make sure it’s out of the way of the tilt adjuster and in a good location, where you can easily access it. Then fully tighten that up.
This is the ground wire that grounds the indicator light to the stock. The bolts that you previously removed, that hold the cluster on, you want to take this ground wire and stick it right on top. Then insert your bolt when you go to fully tighten this back up, and that will make your good, solid ground.
Now the turn signal kit’s installed. Go ahead and reinstall the components you removed. Make sure all the wiring is tidied up and tied out of the way, and you’re good to go.
About atv turn signal kit
“super atv turn signal kit”
“tusk atv turn signal kit”
“polaris atv turn signal kit”
“superatv plug and play turn signal kit”


